Back to Main Review by Jérôme Daoust.
Findings by Peter Loeskow
Created 2005/2/21, revised 2005/4/18
I do not see any
advantage in shuffling pairs of batteries. Instead, I suggest regularly using
two NiMH batteries in bank 1 and two alkaline or even
two more exotic and expensive single-use batteries in bank 2 as a sort of
emergency backup. This has among others the advantage of being more at liberty
to play or rather practice with the instrument, like while driving in a car
uphill and downhill or towards a waypoint. First you need to determine which is
which of the two pairs of batteries in you 5020 or Competino, of course. My
older 5020 Technical Manual Vers.1.10 says that bank 1 is the "inner"
one. The most recent firmware (Version 1.12g), however, says that bank 1 is the
"outer" one! To determine with certainty, which one is bank 1 in your
instrument (in mine, it's really the inner one, but for all I know, it may well
be the outer one in later makes), remove one pair of batteries. If it then is
impossible to turn on the instrument, you have definitely removed those from
bank 1. If you can turn on the instrument, ascertain that the remaining
batteries are those in bank 1 by making sure that the upper battery indicator
shows voltage and not the lower one (in other words, that the instrument has
not switched over to bank 2).
Adding waypoints
& a WP list
A competition is by
no means the only reason to enter waypoints into a Competino/5020. A list of
waypoints is prerequisite to the "drawing" of a CTR on the map page.
One could also obtain from others and enter the coordinates of reliable thermal
generators unknown to oneself. The procedure:
- In the flight instrument options
window, choose "waypoints".
- The pop-up window has the header
"waypoints/routes" and below the window is a button with folder
symbol on it. This button is a dummy, a useless decoy! Do NOT waste any
time on it and on what pops up when you click on it! I tried, but never
got the hang of it. Instead, click "download" so that the
waypoints and routes from the instrument are displayed and work from
there. Place your cursor on the first line that has appeared in the
window: "Waypoints( Name:Description
...". Never mind the useless yellow streamer with those very same
words that pops up below your cursor!
- Click RIGHT and then click on
"new". Consequently, a new sample waypoint with blue-marked text
on white background appears. There you insert your own letters and figures
instead of the sample ones. Make sure you do not change anything else but
leave everything but the letters and digits exactly where it was. If you
work with more than one WP, it is advisable to do this in Notepad or even
Word with it's zoom option.
- Copy the blue-marked sample,
paste it in to the word program a couple of times and then edit those
lines. Paste your own waypoints back into FlyChart one at a time.
- Any waypoint on the list can be
edited etc. like any text by using the left AND RIGHT mouse buttons and
choosing the appropriate option. Giving a description more detailed than
this is not feasible.
The complete
waypoint list (black text on grey(!) background) is
uploaded to the instrument by hitting the upload button, of course, just as
with the rest of the instrument options.
With
firmware 1.13, among "Basic Settings" in the instrument's Main Setup Menu, the option to choose "Battery
Type" has been added. This is an improvement, of course, because
NiMH-accus continue to deliver current at a voltage which would correspond to
an almost flat alkaline battery. In recent years, Garmin had introduced this
feature, and fortunately it is now available in the Competino/5020, too.
This means, that
with the arrangement that I have proposed earlier, to use two NiMH accus as the
normal power source for the instrument and to have alkalines (which have the
advantage of negligeable drain during storage) strictly as a reserve, it would
make sense to enter "1" for the NiMH battery type in "basic
settings".
An alkaline battery supplies approximately between 1.2 and 1.5 Ah. A
lithium battery costs a lot more but it delivers 2.2 Ah.
Adding a country in FlyChart
If you expect to
fly in a country that is not in the list that comes with the program, the task
to add one can be a bit tricky. So here's the trick:
Do not waste your
time (as I wasted mine) hoping and trying to enter the name or code number of a
country after hitting the "insert" button (with a + and an arrow) on
the "Place list" pop-up, which appears after you double click on one
of the places in the "places/countries" page. What you must do to add
a new country is double click on one of the country names in the lower left
hand corner of that page, and then use the insert button on the "Country
list" pop-up.
Flights recorded, but with only data and no barograph shown
in FlyChart
At present, it is
possible to record a flight which does not look too bad on the instruments
"Flight analysis" display, and you can see the track log on the
instrument's map page, but then it is sometimes possible that FlyChart does NOT
display any track log or barograph diagram.
One possible cause
is that the pilot has been negligent in setting a correct A1 altitude before
take off. To prevent a "negative" altitude, which FlyChart refuses to
accept, may be one should make it a habit to set the A1 at one's home on a
daily basis ;-)
However, there are
even instances, in which FlyChart does not validate a flight, although the
take-off altitude has been set correctly, because the barometric height
recording sort of overrides the A1 record. In other words, on a high-pressure
day at a coastal site, a negative altitude could be recorded and in that case,
any attempt to search for a barograph page of that flight will be in vain.
Flytec is now aware of this problem, so may be it will be
eliminated in a couple of months with another version of FlyChart.
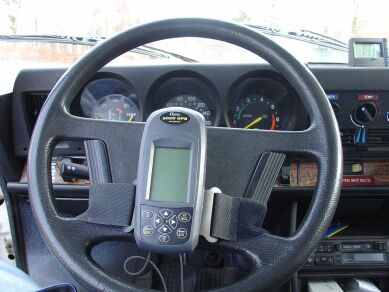
Familiarization in motion
I had at first contemplated to fabricate a mount for placement of my Flytec
5020 on the dashboard. Seeing the instrument screen while looking though the
wind screen would have been best for navigation, but then I chose a more realistic
placement, albeit a more hazardous one...
I strap the instrument to the steering wheel for training and
familiarization exercises. There is no doubt that this means you have to take
special care to avoid ditching the car or colliding with another one. On the
other hand, while using the instrument in the air, you also have to take care
to not collide with the terrain nor another glider, so it is probably a good
way to increase the ability to listen to the vario (this requires that you do
not live where the terrain is flat as a pancake, of course) and to only throw a
quick glance at the screen every now and then and nevertheless absorb all the
information that is useful. Doing very quick changes between the vario, map and
cross hair pages and the three different user selected pages can also be
practiced while driving, a skill that later comes in handy while piloting in
rough air.
But be sure to not focus your
attention too much on that
instrument on the wheel, remember to divide your attention between the inside
and the outside of the car and it's movement!
Storing flight data in FlyChart
When you have
double-clicked on a flight in the "Overview of flight memory" that
shows up after the first download from the instrument's flight memory, and that
particular flight's data have also been downloaded to Flychart, a "save
as" window pops up, with a predetermined name for the igc file. That does
not mean that you have to accept that name as it is, though. More below.
After you have
chosen to save the igc file in flychart's "data" folder, the baro
page shows up, with the data page behind it. When you close the baro and data
page by hitting the customary X, you are
asked "Store new flight in data base?".
That very base
may be limited to 20 flights and may be full aready. In that case, you may well
choose "No". This results in this particular flight not being listed
on the "Flights" page, but it is nevertheless still perfectly
accessible. All it takes to access that flight's data and diagrams is an extra click or two: In the file menu, you
choose "open file" and open the abovementioned igc file in the
"data" folder. When you click on the line in the "overview of
flight memory" that pops up, the
baro page is displayed, just as it is when you have clicked on a line on the
"Flights" (database) page.
An example of a
igc file name is 52SA3YI1.igc. I do not now what it signifies. I do know,
however, that it would be very hard if not impossible to discern a particular
file name and contemplate the diagrams of a particular flight if I store a file
name like that unaltered - so I add a little something to make this file
discernible from the others. The example is from a test run with an automobile
on the 28th of February, so I named it 52SA3YI1bil28.igc
If it had been an
actual flight, I would have given the original name a few extra characters to
signify the site and the date.
I do not know
yet, however, if the OLC accepts a customized file name. May be it would be
wise to submit the file to the OLC with the original name and customize it only
afterwards...
Additional User
Selectable Fields
The instrument's firmware upgrade, which provided the additional crosshair (waypoint) page, opened up new possibilities to display user selectable data. Flychart as it is now, will only allow using the PC to change user selectable fields in the three versions of the vario page.
To choose what you want to be displayed in the user selectable fields in the three versions of the crosshair page, you have to proceed like this:
With the right arrow button, you select crosshair page 1, 2 or 3.
With the left arrow button, you select the field.
With the up and down button, you choose the kind of data to be displayed.
You'd better take these steps indoors, because you cannot do this while the instrument is recording.
The added capability to view groups of data selected by the user is especially useful for those that you want to look at only occasionally. One such group that I chose to put on a crosshair page is 1. time of day, 2. flight time and 3. temperature.
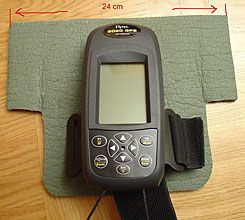
Efficient Protective
Cover - At No Cost
When I considered upgrading my flight instrumentation to a costly Flytec 5020, I decided that I would only take that step if I could find a way to protect it adequately in the event of an occasional botched take-off or landing. I finally figured out a solution, so I bought the 5020. I wouldn't leave home without this cover, in fact I have it on the instrument even when I carry it around the home or when I store it.
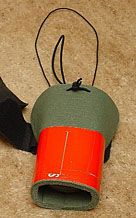
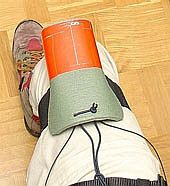
The cover is made of closed cell foam of the kind used for insulation beneath sleeping bags,
forming a sort of tube with a rather tight fit around the protruding part of the instrument that is strapped to a thigh. Gps reception and vario work as usual, but the cover muffles the sound a bit, which can be countered by increasing the audio volume, of course. After gaining sufficient height, the cover is removed and stuffed at an appropriate place. Before landing, especially in an area that is not ample and with a distinct head wind, the protective cover is pushed back on to the instrument. If you drop and loose the cover in the process, it is of little concern, because a new one can be fabricated at virtually no cost when you return home. However, I had added a loop of chock cord to the cover for good measure. There are advantages to that, but instead of putting the cover into a pocket during the flight, I now squeeze it under one thigh or between both.